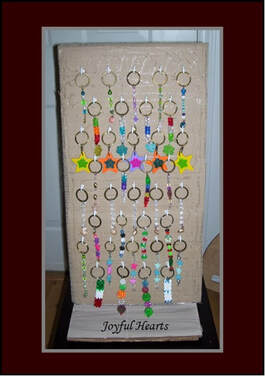
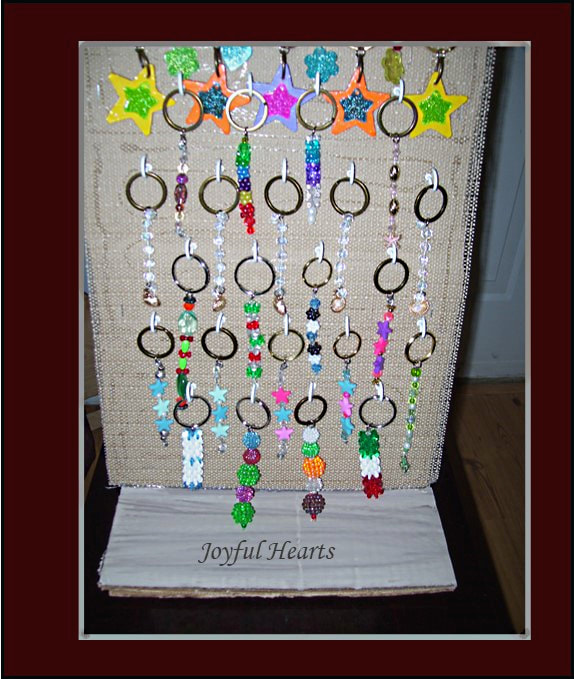
I was finally able to finish making this keychain display board. The base is made of two larger pieces of cardboard, and two smaller ones set on the edges to give it a little ridge. Then I painted the top to look somewhat like rough wood. The two sides of the board were also made of a piece of cardboard for each side. This I covered with brown paper (from filler we got in packages) and then with inexpensive shelf liner. On each side of the display board, there are 36 white cup hooks of 7/8 inch each. The board can hold 72 keychains in all.
0 Comments
Here are a couple of the things I'm working on to hopefully sell at craft fairs this fall. it is still July, but it is already time to start figuring out which places we want to go for this year's fall craft shows. It is hard to believe how quickly time goes by. Candy Flowers Here are just four of the candy flowers I have made. The goal is to have at least 50 and even 100 if possible. These are a little time consuming to make but they are fun and pretty. Upcycled Gift Tags: These gift tags are made from old greeting cards and other types of colorful paper scraps. They are very fast and easy to make and so cute. So far, I have over 100 of the fall themed ones. Some of these are pictured below. Will be doing winter themed ones next. Wow! It is hard to believe that it has been six months since I posted here. Well, this is a look at one of my most recent projects -- a mixed media picture for which I used paint, egg shells, Mod Podge, and beads. This came out nice and bright and cheery. Flowers in a Sunny Meadow First I started with a blank canvas and then did a wet background of grass and sky. I used a sponge to add some texture and depth to the grass. After the background and grass were painted and dry, a bright, happy sun was added in the upper right corner. This was then varnished and allowed to dry. After the canvas had been painted, varnished, and dried, I lay out my design to get an idea of how things would look. The smaller beads seen in the lower left corner of this picture were at our local Dollar Tree store. There were at least six different colors and thirty-six shades all together. This was 6.6 ounces of beads for six dollars plus tax. I was excited to find these beads for crafts and card making. The next step was to make the pathway out of crushed egg shells. A generous amount of Mod Podge was used to keep the egg shells glued in place. This was left overnight so that the Mod Podge could dry. An old plastic egg carton made a great receptacle for separating out the beads. The tweezers made transferring the beads to canvas much easier. Lastly, the beads and a happy butterfly were glued on with Allary Craft & Hobby Liquid Adhesive (available at Dollar Tree, the little bottle with the blue lid). Again, the glue was allowed to dry overnight. Now, here is a cheery picture of flowers in a sunny meadow to brighten someone's room. Disclaimer: These are not money saving ideas. In spite of what various websites and youtube videos try to get across, saving money to heat the house during very cold weather is just out of reach for most people. Also, no results or safety can be guaranteed with any of these ideas, so please use them at your own risk and discretion. These tips are specifically for houses that do not have central heat. When I search various websites or youtube, most of the ideas I find for keeping the house warmer work well if a person has central heat or if they have south facing windows. We live in an old house without central heat and our south facing windows are small. Most of the ideas for keeping the house warmer did not help us too much. Some ideas were not very practical. For example, there was the garbage heater. That is inexpensive. However, we have no way to hook it up here, and it looks very dangerous to me. Another idea was to vent the dryer to the inside and use the dryer to heat the house. It was not quite that simple, but that was the basic idea. That did not seem very safe to me either. It seems like that would take a lot of oxygen out of the air. Still another idea was to insulate the house with straw. While I admit that would certainly make the house warm, it is not safe at all. If any spark were to touch any of that straw, the house would be up in flames in a very short time. If your house catches on fire, you have three minutes to get out. If a house insulated with straw catches on fire, my guess is you would have about 30 seconds to get out. The straw house might be warm, but it really doesn’t seem like a good idea. There were various other ideas that people suggested. Some were good ideas, but most are not really workable for the average person, especially one who is renting an old, cold house. So, what are some tips to help keep the house warm? 1. Open blinds and curtains on windows where the sun shines in. If you have a screen door on which you can shut the glass in the winter and that door faces the sun, open the inside door. A little cold air will come in, but the sun that comes in is much warmer than the cold air seeping in the sides or bottom or top of the door. Close the door again when the sun is no longer shining on it. Close blinds and curtains as soon as the sun goes down or keep them closed if it is rainy and windy. That helps to conserve some heat. 2. Use a homemade CD mirror decoration (see picture) or just a mirror to reflect sunlight coming in the window. The CD decoration is prettier because it makes rainbows on the walls and maybe the ceiling or floor too, but the mirror works just fine. Set up the mirror so that it reflects sunlight to the opposite side of the room. You will probably have to move the mirror every half hour or so. 3. Cover the windows with clear plastic. If you want a little bit of air and your windows open at the top (ours do), then leave the top part of the window uncovered. Most of the cold drafts come in the middle or bottom of the windows anyway. The clear plastic helps keep cold out but lets light in and allows you to see outside. Clear plastic shower curtains are easy to use for this and can be purchased at WalMart for a little over $2 or at the Dollar Tree for $1. 4. Put draft stoppers at the bottom of the doors. If you don’t have a draft stopper, an old towel will work. Just roll it up, but not too tight, and tie a piece of string around the ends and the middle (so it doesn’t come unrolled) and push it up against the door. If your couch is against a wall, especially against an outside wall, put draft stoppers all around the bottom of the couch. Old sheets rolled up work well for this. Just tie a string around each end and one around the middle to keep it from coming unrolled. You would be amazed how much cold air comes in from under the couch. Just put a thermometer under it for a few minutes and then check the temperature, and you will see how much cold air gets trapped under there. 5. Use terracotta pot heaters. Now, if you are running baseboard heat or an electric or infrared heater and your room does not get warm, the terracotta pot heater is not going to heat your room. However, it does add a little bit of heat to the other heater. The temperature in our north facing living room usually goes down a couple degrees between 9:00 a.m. and 12:00 p.m. on really cold days. With two terracotta pot heaters in the living room, the temperature has gone up 2 degrees. So, it does at least help in not losing heat. There are quite a few variations of the terracotta pot heaters and some simple DIY video tutorials on youtube of how to make them. They are easy and inexpensive to make. Tealight candles are typically used in them because they burn a long time for their size. They are also inexpensive and can be purchased at WalMart – about $4 for a hundred tealight candles. The disadvantage to the terracotta pot heaters is that should not be used at night. Even though they seem relatively safe if used correctly, these heaters do use candles, which have an open flame. A burning candle should never be left unattended or unobserved. 6. Use the oven. Really cold days are great days to do baking, roast nuts, etc. You can even run the oven and leave it slightly open for short intervals at a time – 15 to 20 minutes. This is probably not a good idea if you have a gas oven, however. Also, this should not be done at night. A person may fall asleep and not shut the oven door and a fire could result. The oven does pull a bit of a load on the power grid but uses less than an electric heater since the elements tend to stay hot for a good while. 7. Use a hot box or just plain hot water. This is not a money saving tip, and it does require electricity. However, it only requires the electricity to reheat the water heater and would not pull a continuous load on the power. You can take old gallon jugs or 3 liter jugs and fill them with hot water. I use water that is about 135 degrees. Some of the jugs I place in a “hot box.” (See picture) The hot box can either be covered with a light throw or old towel or just left open. It will hold the heat about 6 to 8 hours if covered and about 4 to 6 hours if left open. A good size is a box that will hold about 3 jugs. Although the water temperature is around 135 in my jugs, the hot box only gives off about 75 to 80 degrees of heat and it does not diffuse around the room. So, I put it in strategic places – in front of the window, in the coldest corner of the room, and so on.
If you don’t have a box, just fill three or four jugs with hot water and put them close to each other. They will stay warm for about 4 hours – give or take a little. As noted above, this is not a money saving tip. On the really cold days like we have been having, I fill about 15 to 18 jugs three times a day and once during the middle of the night. This uses a lot of hot water and is like taking several showers a day. But the warm water does work amazingly well for keeping the heat in the room. Pots of boiled water work well too. Fill up a good size pot with water and put it on the stove to boil. After it boils, set it in whatever room is the coldest. Use a hot pad to set it on so as not to burn a surface or cause a heat or water stain. This will stay hot for several hours as well. Well, Those are a few tips for helping to keep the house warmer in the winter. I hope they are somewhat helpful during this really cold weather we have been having. They can also help to put a little less load on the power grid. If everyone would take measures to keep the heat from escaping and to warm their houses a little in creative ways, that would help to conserve the electricity for everyone and prevent power outages during these cold snaps. We needed a place to put our little plastic bags where they would be easy to find and would not get mixed up with our big plastic bags. Sooo, this is what I came up with -- the Patriotic Mini Plastic Bag Caddie. The dimensions are about 5 inches high by 4 inches wide. These are fast and very easy to make.
Handmade greeting cards is a craft I tend to shy away from due to having issues with perspective. I have a hard time telling exactly where to put things. However, I decided to go with simple. Just looked around the internet for some clipart pictures. These were printed. Little details were added as well as some embellishments like beads, googly eyes, and cording. Then these were either glued to the cards or adhered with double sided sticky tape. I was excited about how they came out.
Here is a look at the five cards I made this week. Which one is your favorite? I was so excited when I found these beautiful glass gemstones at Mighty Dollar. I really didn't need any more stones, but these were so pretty. I thought about going back and getting them later, but there were only three containers left; so I picked one up. Inside the package were clear stones, green stones, pink stones, leaf stones, and butterfly stones. It was just a little disappointing that there were only eight butterfly stones in the container. But, there were enough lovely stones there to make two pretty projects, and there are even some stones left to use for something else. First I lay my stones out how I wanted to arrange them. Then I carefully glued them onto my candle holders using some permanent craft glue. The candle holders came out really pretty. Amigurumi is starting to grown on me, I think. It is so fun to take some yarn, a hook, and a little fiber fill and watch these materials turn into something cute. There are all sorts of creative possibilities. Take these Cute Keychains for example. For the raccoon and bird key chains, I loosely followed patterns in the book Woodland Crochet by Kristen Rask (purchased a while back at Aldi), but I made the heads only. For the others, I just looked at a picture and went from there. Here are all the keychains together. The mouse, second from left, was originally supposed to be a cat; but, try as I might, I could not make cat ears. So, it was turned into a mouse. Of all these keychains, the bird and the octopus were the easiest. And, I think the octopus is my favorite. Which one do you like best? This week I've been doing fun projects for crochet -- like this jet liner and these little airplanes. Or this sheep pillow that I made Mom for Mother's Day. But the cutest project has been this little Colorful Caterpillar. This was fast, fun and really easy to make. The whole project probably took about two hours. I just crocheted little balls and sewed them together. Then I made eyes and mouth and little antennae. Here is the cutie! |
Archives
August 2022
Categories
All
Ways to Earn and Save
Try ShopAtHome for cashback when you shop. Visit the site for more info.
Southern Savers is a great place to keep up to date on coupons and deals.
Join Swagbucks and earn money for searching the internet, answering a Swag poll, and doing other fun things each day.
This video by Gospel for Asia about Christmas has a message that reaches right into the heart and makes us think. |